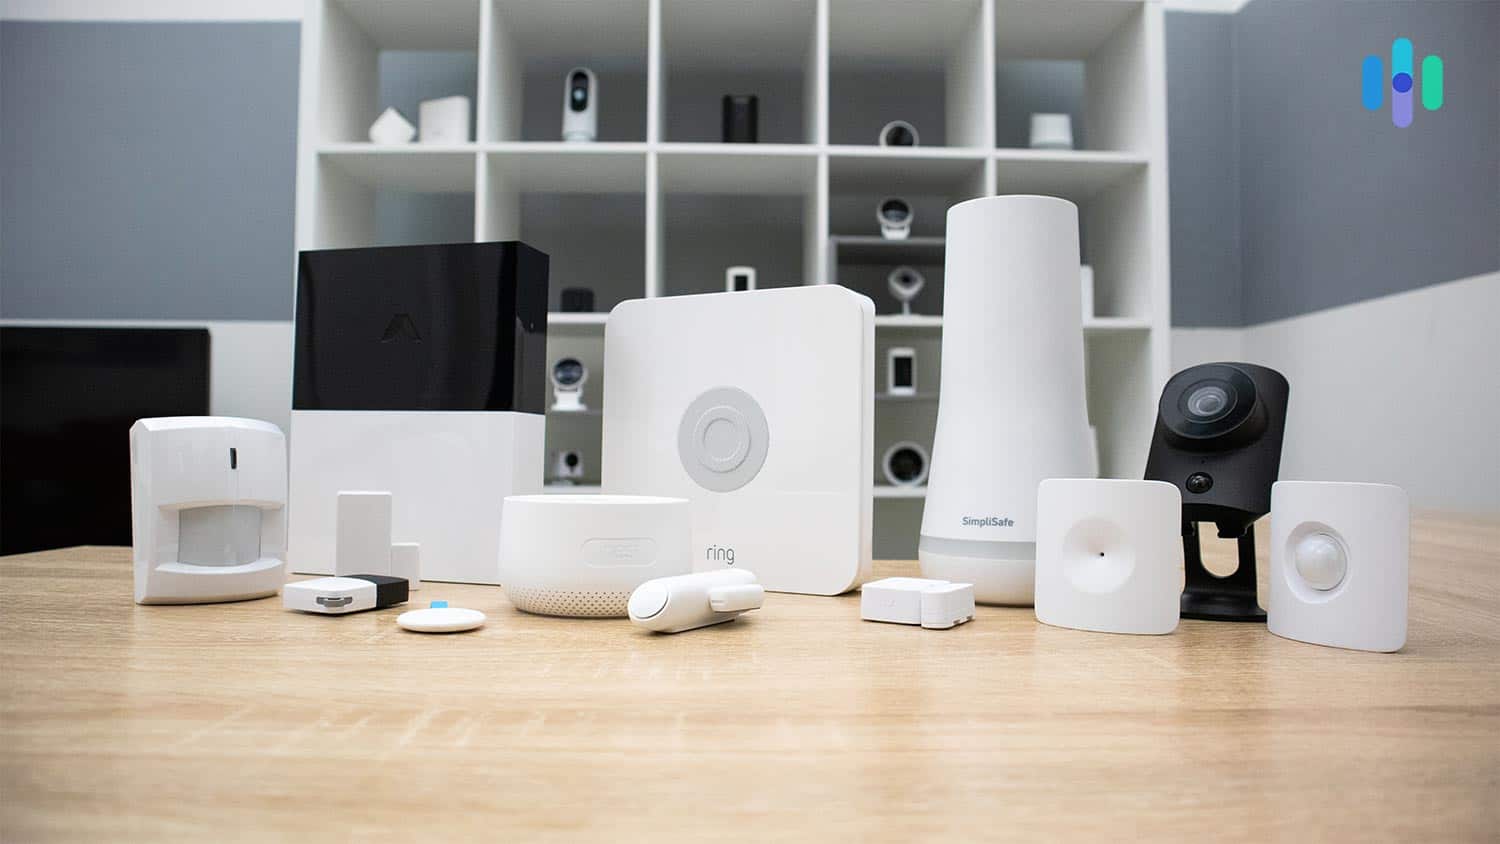
The Best DIY Home Security Systems of 2025
SimpliSafe is a simple and affordable security system, but it offers advanced crime-busting features such as Intruder Intervention and Active Guard.
 &
&
 Last Updated on Oct 13, 2025
- No need for professional installers
- Easy to set up voice commands and routines with both Alexa and Google Home
- Pick out the components that are right for your particular living situation
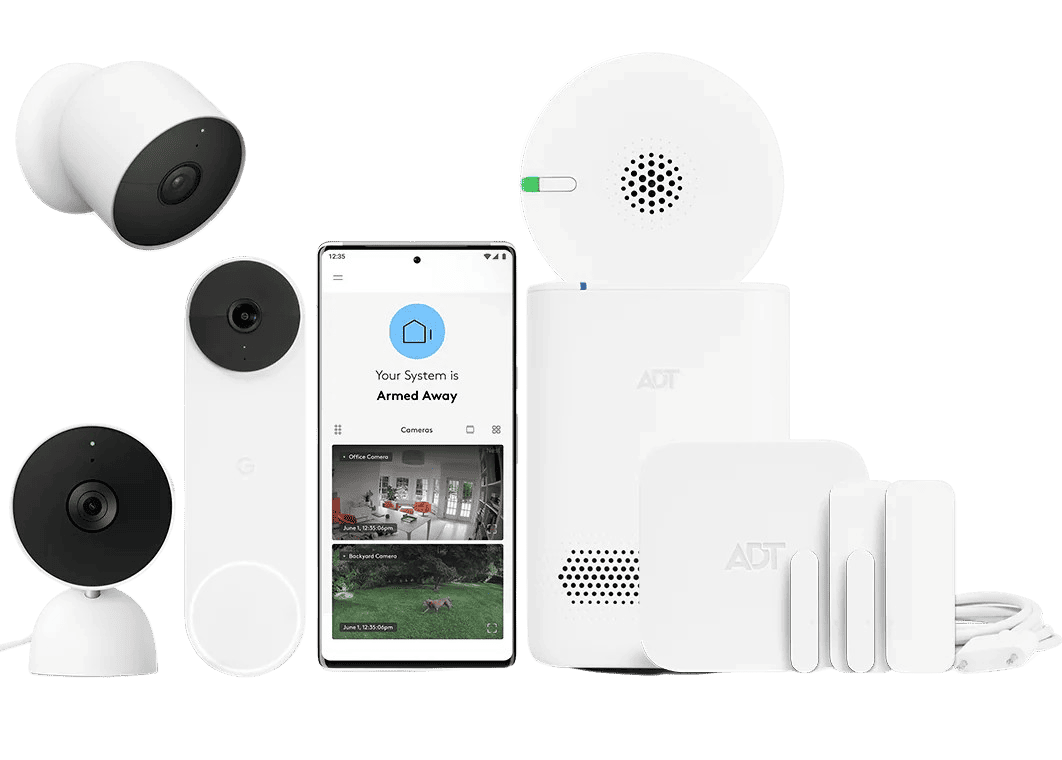
- Mix of ADT and Google Nest equipment
- High-end security cameras with person and package detection
- Nest Aware subscription included in Essential + Video plan

- Affordable equipment and frequent deals
- Systems are fully customizable
- Ships pre-paired sensors and equipment
Is it really possible to DIY a working home security system? Sure, there are indoor cameras that sit on bookshelves, motion sensors you can mount using adhesives, and doorbell cameras you can install without wiring. But those are individual components, not a cohesive security system.
Our team recently tested home security systems that claim to offer an easy DIY installation. We found that it is possible to DIY a security system, even if you’re not an expert like us. You just have to pick wisely. We chose SimpliSafe as the best DIY option to recommend. Not only was it easy to set up, but we also saw advanced features such as Intruder Intervention. We also think ADT, Cove, abode, and Frontpoint are great options. Keep reading for the full scoop.
>> Learn More: The Best Security Systems of 2025

The Best DIY Security Systems, Ranked
- SimpliSafe - Best DIY Installation and Monitoring
- ADT Self Setup - Best Equipment
- Cove - Most Affordable
- abode - Most Flexible Monitoring Options
- Frontpoint - Best Customer Service
How We Compared DIY Security Systems
We’ve been comparing security systems for many years, including both those you install yourself and those installed by a technician. To make apples-to-apples comparisons across the entire home security spectrum, we focus on both the equipment and the monitoring options available.
- Equipment: Not all security systems are the same. Some focus more on sensors, while others have a wide selection of security cameras. Choose a security system that offers equipment that meets your security needs.
- Monitoring options: We highly recommend professional monitoring, but not everyone needs this level of protection. For DIY systems, in particular, we like those that offer the flexibility to opt in and out of professional monitoring.
But because we’re focusing exclusively on DIY systems, it’s also important to assess ease of installation. If you’ve ever put together furniture that you bought from Amazon or IKEA, you know that the setup process is critical to both your overall experience and the end product. If you botch the installation on your DIY home security system, you’re not getting the most value for your investment, and you could be exposing your home to intrusion without knowing it.
Ready to dig into all our findings? Let’s start!
Side-by-Side Comparison of the Top DIY Security Systems
| System |
SimpliSafe
|
ADT Self Setup
|
Cove
|
abode
|
Frontpoint

|
|---|---|---|---|---|---|
| Ranking | 1st | 2nd | 3rd | 4th | 5th |
| Ratings | 9.8/10 | 9.0/10 | 8.7/10 | 8.0/10 | 8.9/10 |
| Installation time | 30 minutes | 30 minutes | 30 minutes | 45 minutes | 45 minutes |
| Equipment tested | Sensors, security cameras, video doorbell | Sensors, security cameras, video doorbell | Sensors, security cameras, video doorbell | Sensors, security cameras, video doorbell, home automation | Sensors, security cameras, video doorbell, smart thermostat |
| Monitoring style | DIY or professional | DIY or professional | Professional | DIY or professional | Professional |
| Professional monitoring cost (per month) | $21.99 and up | $24.99 and up | $19.99 and up | $25.99 | $49.99 |
| Contract required? | No | No | No | No | Yes (3 years) |
| Read Review | SimpliSafe Review | ADT Self Setup Review | Cove Review | abode Review | Frontpoint Review |
What’s The Best DIY Security System For You?
-
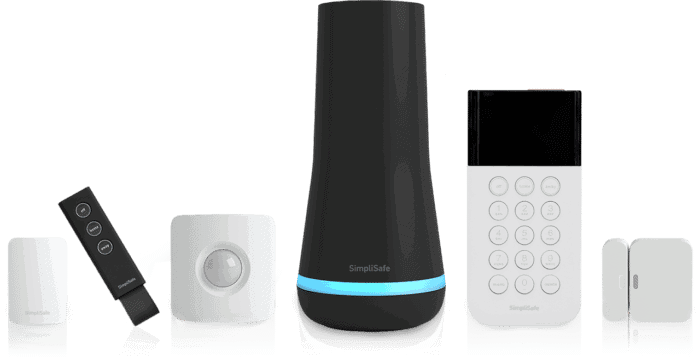
1. SimpliSafe - Best DIY Installation and Monitoring

Product Specs
Equipment Costs Packages starting at $250.96 Monitoring Options Professional and DIY Monthly Monitoring Costs Starts at $21.99 per month Contract Lengths Month-to-month Installation Options DIY or professional Smart Platform Integration Alexa and Google Home SimpliSafe was one of the easiest systems to install. The Wireless Indoor Camera sits on a shelf and the motion sensors stick to surfaces using the included adhesives. We also like the flexibility of SimpliSafe monitoring plans. If you need a security system for renters, you can keep costs down with self-monitoring and video recording plans. For security systems protecting larger homes, subscriptions with Active Guard and Intruder Intervention offer greater protection. You can also switch between these plans whenever you want.
>> More Details: SimpliSafe Video Doorbell Pro Review
What We Like
- Set up in 30 minutes
- Indoor and outdoor security camera options
- Cellular and battery backup
- Optional professional monitoring
What We Don’t Like
- Live video monitoring for Wireless Indoor Camera comes with privacy risks
- Recent monitoring rate increase
- Security cameras don’t record locally
- Security cameras require a separate cloud storage plan or the Fast Protect plan to record
Installing SimpliSafe
It only took 30 minutes to set up SimpliSafe, with most of that time dedicated to hardwiring the Video Doorbell Pro. We ran into one delay after realizing we needed to charge the battery for the outdoor camera overnight. Other than that hiccup, here’s the process we followed.
- We plugged in the base station and turned on the keypad by removing the battery tab. They connected to each other immediately.
- We downloaded the app and signed in. We also linked the base station to our app and connected it to Wi-Fi.
- Using the app, we paired sensors individually with the base station.
- We placed the sensors using the peel-and-stick adhesive backing that came with them.
- We plugged in the indoor camera, scanned a QR code using the app, and connected it to Wi-Fi.
- We followed the same steps to connect the outdoor camera to Wi-Fi after charging it overnight. We then mounted it out on the porch.
>> Read More: The Best Battery-Powered Security Cameras
Expert Tip: SimpliSafe’s sensors come with adhesive tape that works great… for a while. To avoid hearing a crash in the middle of the night, we recommend anchoring them with screws instead.
SimpliSafe Equipment

All the SimpliSafe equipment we bought was enough to cover the 2,500-square-foot house we tested it in. SimpliSafe’s equipment range is budget-friendly, but it doesn’t look or feel cheap. When we got hands-on with the products, we found devices like the motion sensors lightweight, but durable. Most of the equipment is even quite stylish compared to some other home security systems we’ve tested.
One thing we really like about SimpliSafe’s equipment is that, while it’s more affordable than security systems from ADT and Vivint, the company didn’t skimp on features. Comparing SimpliSafe and ADT, we found that both systems offer cellular and battery backup to keep the equipment running through power and internet outages. At one point, SimpliSafe ran for four hours during a neighborhood-wide outage. The only exemption was the hardwired SimpliSafe Video Doorbell.
SimpliSafe security cameras Price Wired Indoor Camera $99.99 Wireless Indoor Camera $149.99 SimpliSafe Outdoor Camera $199.99 SimpliSafe Video Doorbell $169.99 >> Further Reading: The Legality of Security Cameras and Video Surveillance
SimpliSafe Monitoring
Although we like SimpliSafe’s DIY approach, we recommend pairing it with professional monitoring. Prices start at $21.99 per month for the Standard plan, which activates cellular backup and professional monitoring. If you have SimpliSafe cameras like we do, we suggest the Core plan. It’s $31.99 per month, and adds camera cloud storage, Intruder Intervention, and video verification that can speed up police response.2
We chose the $49.99-per-month Pro plan to test Active Guard Outdoor Protection. It works similarly to Intruder Intervention, but it’s for the outdoor doorbell cameras. While SimpliSafe’s plans vary in price, there are no contracts. We easily switched from the Pro to Standard plans when we worked from home and could be more hands-on. This flexibility is what makes SimpliSafe such a great DIY system.
Test Result: We simulated a break-in to trigger Intruder Intervention. As soon as the front door entry sensor detected us, the indoor camera came alive and we heard a voice telling us we’re on camera and that the police are on the way. All that happened within 20 seconds of us opening the front door.

We wall-mounted the battery-powered SimpliSafe outdoor camera to keep watch of our property.  Expert TakeFrom Gene Petrino, Retired SWAT Commander and Law Enforcement“I’ve investigated numerous incidents where a suspicious person was seen in the backyards of homes, checking windows and doors, and fled as soon as they realized that there were security cameras capturing their every move. In one specific situation, the suspect tried to disable the camera, only realizing that another camera was capturing his activities.”
 -
2. ADT Self Setup - Best Equipment

Product Specs
Equipment Costs Packages starting at $269 Monitoring Options Professional or DIY Monthly Monitoring Costs Starts at $24.99 per month Contract Lengths Month-to-month Installation Options DIY Smart Platform Integrations Alexa and Google Home ADT has one of the best professionally installed systems, which is what we tested in our ADT review. If you want to do it yourself, ADT Self Setup is also available. You won’t get the expertise of a technician telling you the best places to put your equipment, but we still managed to get everything installed correctly within 30 minutes. One reason is ADT offers Google Nest Cams, which are wireless and require very little effort to set up. That doesn’t mean they’re less reliable. We have a lot of reasons why we think they offer the best equipment.
>> Read More: Google Nest Doorbell (Battery) Review
What We Like
- Mix of ADT and Google Nest equipment
- High-end security cameras with person and package detection
- Nest Aware subscription included in Essential + Video plan
- Affordable professional monitoring
What We Don’t Like
- Limited sensor options
- No included keypad (costs an extra $89.99)
- Bulky hub
- Not as smart home-friendly as other options
Installing ADT Self Setup
We usually get our ADT security system professionally installed, so it was our first time installing ADT equipment ourselves. Here’s how it went:
- We plugged in the ADT hub and downloaded the ADT+ app.
- We paired our phone to the hub via Bluetooth then connected to our Wi-Fi.
- Next, we paired all our sensors, which took about ten minutes.
- Then we set up the Nest Cam and integrated it with our Nest Hub Max. We already had a Nest account, which logged in via the ADT+ app. Setting up each camera took about five minutes.
Note: The hub only connects to 2.4 GHz Wi-Fi channels. If you have a dual-band router, make sure you connect your phone to the 2.4 GHz band before pairing the hub. If you’re connected to the 5 GHz channel, it simply won’t connect.
It took us about half an hour to get our ADT system running. We didn’t run into any problems, but it was reassuring to know that ADT offers a free Remote Assistance service. You can schedule a video call for an expert to walk you through the process. It’s a handy feature for first-time DIYers.

Because it’s battery-powered, we installed the Nest Cam (battery) high up to give it a better vantage point. ADT Self Setup Equipment
ADT has offered DIY systems in the past, but it was a different offering to its professionally installed packages. That’s not the case with ADT Self Setup. You get access to the same high-quality equipment regardless of whether a technician installs it, or you do it yourself.
The highlights are the cameras. Google Nest Cams are technically a third-party, but unlike our experience with Cove, the ADT+ app managed and monitored the cameras directly. The same goes for other Google products like the Nest Hub Max. Even though we already tested the Google Nest Cam (battery) as a standalone unit, using it and the other Nest Cams, like the outdoor Nest Cam with Floodlight, as part of an ADT system was a refreshing experience to us.
>> Check Out: The Best Outdoor Security Cameras of 2025
")
The ADT window sensor’s new design borrows some ideas from Google Nest, including the curved form and slim profile. ADT Self Setup Monitoring
ADT’s Self Setup monitoring plans are cheaper than the professionally installed systems, but you still get all the same features. Prices start at $24.99 per month, $10 cheaper than pro-installed setups. Another similarity is that if you have security cameras, you need the top plan.
ADT Self Setup professional monitoring Secure Smart Complete Cost per month $24.99 $29.99 $39.99 24/7 Professional monitoring Yes Yes Yes SMART monitoring Yes Yes Yes Home automation No Yes Yes Cloud video recording (Nest Aware) No No Yes Video verification No No Yes With 12 monitoring centers across North America and half dedicated to home security system customers, ADT’s monitoring system is top-of-the-line. SMART monitoring is the standout feature. It speeds up responses by sending you a text message within seconds of an alert before an agent calls. This helps if you’re in an emergency and don’t have time to wait 30 seconds for ADT to call. It’s also useful if you accidentally trip the alarm and want to cancel it before it becomes a big fuss.
>> Related: The Best No-Contract Security Systems
-
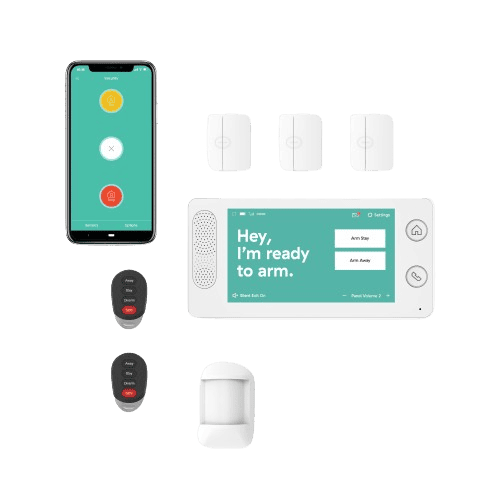
3. Cove - Most Affordable
 View Packages Links to Cove
Product Specs
Equipment Costs Systems start at $86.25 Monitoring Options Professional only Monthly Monitoring Costs Starting at $19.99 per month Contract Lengths Month-to-month Installation Options Professional or DIY Smart Platform Integration Alexa and Google Home
If you’re looking for a budget-friendly security system that doesn’t sacrifice your protection, check out Cove. We picked up an eight-piece system for just $30 during a Cove sale, which seems to be running year-round. You will have to make some compromises, like using two apps to manage your system, but Cove is a reliable alternative if you’re trying to keep costs down.
>> Related: Affordable but Top-Quality Security Systems
What We Like
- Affordable equipment and frequent deals
- Systems are fully customizable
- Ships pre-paired sensors and equipment
- Professional monitoring with security camera support for less than $30 per month
What We Don’t Like
- Some pieces of equipment don’t seem durable
- No smart home automation features
- Limited security camera options
- Security cameras are accessed via a third-party app
Installing Cove
Our Cove system came paired and ready to install, so our equipment was up and running in less than 30 minutes. Here’s what we did.
- Turned on the base unit and connected the touchscreen panel.
- Downloaded the Cove app and the Eufy app, then linked our accounts to the system.
- We installed the sensors and cameras, and turned them on so the touchscreen panel could find them.
- We watched the touchscreen panel sync our equipment.
- We rang Cove to activate the monitoring subscription and test the system.
Our only issue with Cove’s setup is that it requires an app for Cove equipment and a separate app for the Eufy cameras. During our simulated break-ins, we needed to switch between the Cove app to manage notifications and the Eufy app to access the video feed. In a real-life scenario where every second counts, this isn’t ideal.
>> Also See: The Best Security Systems With Apps
Cove Equipment

Without installation fees and with a less than $300 price tag, this Cove security system is the most affordable DIY option we tested. Cove let us pick from a wide range of security and safety components. They aren’t as high-quality as the sensors from ADT Self Setup and SimpliSafe. In fact, they feel plastic-y and a little on the lightweight side. We were careful not to accidentally drop them this time.
As we mentioned earlier, Cove’s cameras are from Eufy. They offer great specs, like 2K video quality, but just like the sensors, they don’t feel as durable as our top security camera options, such as the ones from Lorex. (See our Lorex review.) In any case, they are affordable. We got one outdoor camera for free, and an indoor camera for $59.99 with discounts applied.
>> Learn More: Eufy 2K Camera Review
Cove Monitoring
Cove offers two professional monitoring plans. Like ADT, if you need security camera support, you’ll need the more expensive options. Here’s a breakdown of both Cove plans.
Features Cove Basic Cove Plus 24/7 alarm monitoring Yes Yes Text-based alerts Yes Yes Cellular backup Yes Yes Camera support No Yes Alexa and Google Home voice control No Yes Price $19.99 per month $29.99 per month The main difference between the plans is voice control from Alexa and Google Home and camera support. That means if you plan on including security cameras as part of your system, you have no choice but to go with the more expensive option. ADT Self Setup does the same thing, but its top plan costs $39.99. So Cove Plus is a pretty good deal when you look at it that way.
FYI: Cove Plus also upgrades the equipment warranty from one year to lifetime. But only if you stay signed up to the Plus plan. In our opinion, that’s well worth the $10 increase, which is why it’s what we went with.
A look at our complete Cove system, including security cameras from Eufy. -
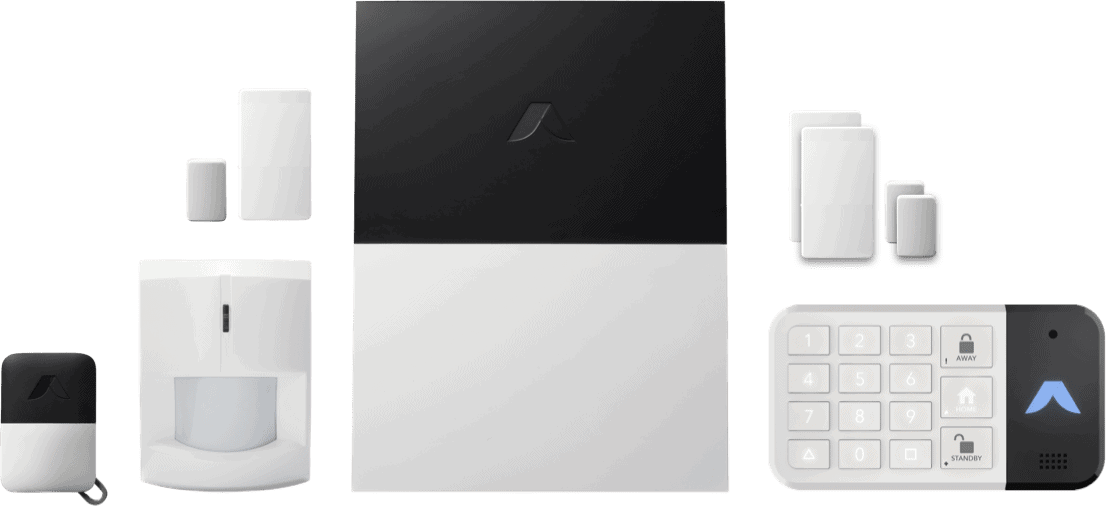
4. abode - Most Flexible Monitoring Options


Product Specs
Equipment Costs Packages starting at $65 Monitoring Options Professional and DIY Monitoring Costs Starting at $6.25 per month Contract Lengths Month-to-month or Yearly Installation Options DIY or professional Smart Platform Integration Alexa, Google Home, and Apple HomeKit
Abode’s flexible monitoring plans reminded us of SimpliSafe. The main difference is that Abode offers better home automation features and lets you integrate third-party equipment, like Z-Wave and Zigbee devices. Abode is also one of the few systems compatible with HomeKit, which is why it’s on our list of the best security systems for Apple users.
>> Related: The Best Smart Home Security Systems
What We Like
- Choice between different types of hubs
- Affordable security cameras (as low as $29.99)
- Quick and easy DIY installation
- Free and premium monitoring plans
What We Don’t Like
- Lots of missing features from free monitoring option (e.g., home automation)
- Internet-reliant without professional monitoring
- No cellular backup even for premium self-monitoring plan
- No smoke alarms or carbon monoxide detectors
Installing Abode
Some of Abode’s equipment came pre-programmed and paired immediately, while others required manual setup. The whole process took about 45 minutes. Here’s how it went.
- We set up the hub and connected it to the Wi-Fi using an Ethernet cable. This allowed us to initialize the hub and register the Wi-Fi SSID and password on the Abode app.
- Our sensors came pre-programmed, so we pulled the battery tabs once they were installed. They paired instantly.
- We used the Abode app to pair our cameras. This took roughly five minutes, which is similar to ADT’s Nest Cam.
abode Equipment

We tested the Abode iota All-in-One security system, the most advanced security system from Abode. All your equipment connects to an Abode hub. Unlike ADT, SimpliSafe, and most other companies, Abode offers three options. Each one offers slightly different features like built-in cameras and motion sensors. Here’s what each model provides.
Smart Security Hub Abode Security Hub iota All-in-One Hub No built-in camera No built-in camera Built-in camera Ethernet-only Ethernet or Wi-Fi Ethernet or Wi-Fi Loud siren Loud siren Loud siren Alexa, Google Assistant, HomeKit, Z-Wave, Zigbee Alexa and Google Assistant Alexa, Google Assistant, HomeKit, Z-Wave, Zigbee No built-in motion sensor No built-in motion sensor Built-in motion sensor Abode’s pricing for packages is based on the hub and range between $59 for the most basic kit to $249 for the iota security bundle. The larger security bundles include entry sensors, acoustic sensors (a.k.a. glass-break sensors), and motion sensors. For our tests, we decided on the iota hub package because we wanted to test the hub’s capabilities. We also added an indoor camera, smart bulbs, and smart plugs.
Product Stats: Abode doesn’t sell smoke alarms, but offers monitors that listen out for smoke alarm sirens. If the siren starts blaring, you’ll get a notification. We recommend checking if your existing alarm is compatible with Abode’s smoke alarm monitor before you buy one.
Expert TakeFrom Gene Petrino, Retired SWAT Commander and Law Enforcement“Many of the false alarms we responded to were from DIY systems. I remember one instance where the homeowner installed the system but never set up notifications. The neighbor called an alarm activation to the police department when they heard the audible alarm activate, and the homeowner was completely unaware. We were able to determine that the activation was caused by a fan blowing a balloon which set off the motion sensor.”Abode Monitoring
We like Abode’s flexible monitoring plans. You can get a free self-monitoring plan, a premium self-monitoring option for $6.25 per month, or a professional monitoring subscription for $16.67 per month for the first year.
We started with the premium self-monitoring plan, which comes with a 10-day video history, person detection, and the CUE home automation engine. After a month, we felt that we needed more, so we upgraded to professional monitoring. It adds cellular backup in case our Wi-Fi drops out, which gives us peace of mind that our system is always online.
>> Learn More: The Best Security Systems With Cellular Backup

One downside of Abode is that it offers only one camera – the Abode Cam 2 that works indoor and outdoors. -
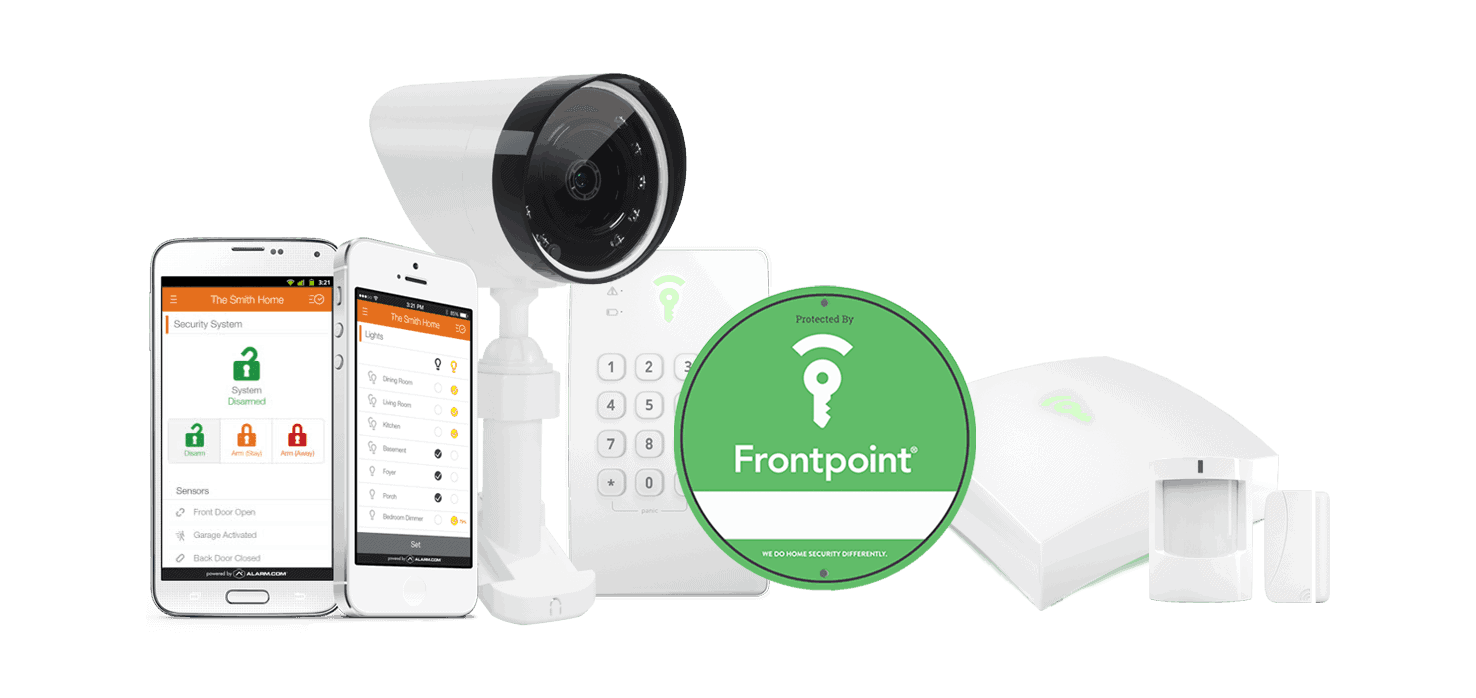
5. Frontpoint - Best Customer Service

Product Specs
Equipment Costs Starting at $69.00 Monitoring Options Professional only Monthly Monitoring Costs Starting at $14.99 Contract Lengths 1-36 months Installation Options DIY Smart Platform Integration Alexa and Google Home Frontpoint stands out for its excellent customer support. That might not sound appealing, but it makes a big difference if you ever need help. You can call, chat, or send a message. We called Frontpoint when we had an issue with our door sensor. As you’ll see below, it was a good experience.
>> Further Reading: Frontpoint FAQs
What We Like
- Customer support available until 11 p.m. (EST)
- 30-day money-back guarantee and three-year equipment warranty
- Semi-affordable equipment
- Functional app
What We Don’t Like
- Universal monitoring pricing for all systems
- Three-year contract
- Limited smart home options
- May require a credit check
Installing Frontpoint
Our Frontpoint installation didn’t go as smoothly as SimpliSafe and Abode. The package arrived late afternoon and we immediately started setting it up. Here’s how it went.
- We started by plugging the hub into an outlet.
- Next, we used the Frontpoint app to guide us through setting up the hub and pairing it with the keypad.
- We connected the sensors, holding the pair button until they were discoverable.
- One of our door sensors wouldn’t connect, so we called Frontpoint. After troubleshooting for about ten minutes, we determined it was likely broken. They sent a replacement.
- We connected the cameras using the Frontpoint app and our Wi-Fi connection.
- A couple of days later, the replacement door sensor arrived and we installed it without any issues.
FYI: No company is perfect, so while we had a great experience with Frontpoint and believe it has better customer service than most, it’s not a guarantee that all interactions with Frontpoint customer support will end like it did for us.

Frontpoint Indoor Camera Frontpoint Equipment
We built a custom Frontpoint system from scratch, starting with the basic kit that costs $129. It included a hub, a motion sensor, and an entryway sensor — pretty bare bones — but we expanded it by adding more sensors, security cameras, and even a smart lock and thermostat. All in all, we spent over $500 on equipment.
We recommend keeping an eye out for Frontpoint discounts, which happen regularly. We’ve seen the basic kits sell for as low as $69 and add-on equipment for up to 60 percent. Considering Frontpoint’s costs are a little higher than other brands, these savings make a big difference.
FYI: If the upfront costs are too much of a strain on your bank account, you can finance your equipment and pay it off over 36 months.
>> Alternative Options: The Best Security Systems Without Credit Checks
Frontpoint Monitoring
Our starter Frontpoint security system with a touch screen keypad (bought separately). Frontpoint requires a monitoring subscription and pushes its Ultimate Monitoring plan for $49.99 per month. We signed a three-year contract for this plan as part of our testing process. It included cellular backup, cloud storage, and home automation features.
Frontpoint also offers a self-monitoring video-only plan, which includes storage. Alternatively, you can choose the Interactive Monitoring plan. It adds hazard professional monitoring for fires and floods. You need to speak to someone to discuss these Frontpoint plans.


")


Why DIY? The Pros of DIY Security
We like DIY security systems because they’re often more affordable, we can set them up in our own time, and we don’t have to clean the house before a technician arrives. Professionally installed security systems are also more expensive. Installation fees can be over $100 and the equipment costs are higher.
>> More Information: How Much Is a Security System?

Today’s DIY home security systems are also beginner-friendly. Brands like Cove and Frontpoint even pre-program the equipment so you’re not wasting time syncing devices. If you get stuck, companies like ADT offer video support with technicians to show you how to fix the issue. Here are some other reasons we like DIY security systems:
- Easy to move: Because they’re wireless, DIY security systems are easy to move to a different address. In most cases, you simply box them up and reinstall them in your new home. You can’t do that with most hardwired systems.
- Renter-friendly: Another advantage of wireless equipment is that it’s easy to remove when you move out. Most sensors attach to walls with adhesive, and some cameras sit on a shelf. With little to no drilling, you’re more likely to get your security deposit back when you choose a DIY security system.
- Cheaper or optional professional monitoring: Not all DIY security systems require professional monitoring. You can self-monitor instead, but it means you’re responsible for contacting emergency services. Instead of putting this burden on yourself, we’d recommend checking out affordable professional monitoring plans from SimpliSafe and Cove.
>> Read More: DIY Installation vs. Professional Installation
Things to Consider: The Cons of DIY Security
All those benefits of DIY security systems also come with disadvantages. Otherwise, professionally installed systems would be phased out. Here are some points to consider before fully deciding to buy a DIY security system.
- Prone to incorrect installation: We admit that we’ve botched our share of security system installations, resulting in calls to customer service departments. Everyone makes mistakes, but a DIY error can be costly because your home security is on the line.
- Warranties are limited: In the same vein, since you’re doing the installation work, DIY systems often have limited warranties, and repairs stemming from incorrect installation will be your responsibility. In contrast, professionally installed systems often come with lengthy warranties and guarantees, like ADT’s six-month money-back guarantee.2
- Limited equipment options: To make installation as easy as possible, DIY systems limit the equipment they offer. For example, ADT Self Setup only offers battery-powered doorbells, so you don’t have to deal with your internal wiring.
>> See Also: The Best Video Doorbells of 2025
DIY Vs. Professional Monitoring
Security system monitoring is optional with some of our top picks. Others require a subscription for the equipment to function. We don’t generally recommend self-monitoring, as it means you need to respond to alerts and call police when you need help. You also miss out on useful features like cloud storage for video recordings and home automation routines.
>> Keep Reading: The Best Security Systems That Work With IFTTT
You can rely on security cameras to deter crime, but subscribing to a professional monitoring plan is more effective. Monitoring centers can actively deter intruders with capabilities like those offered in SimpliSafe and Deep Sentinel plans. You can also access other valuable services like facial recognition, activity zones, and voice control.
Our Methodology for Testing DIY Home Security Systems

To ensure we provide the most reliable recommendations, we installed over 60 security systems in our home, testing each of them for at least two weeks. During our time testing each system, we keep a clear scorecard assessing it based on the following criteria:
- Ease of Installation: DIY security systems need a streamlined process. It shouldn’t take more than an hour to install security cameras and sensors.
- Equipment Options: Even the best hardwired security systems are difficult to install, so we give points to systems that offer wireless equipment.
- User-Friendly App: Our team keeps an iPhone and Android so that they can check the usability of each system’s app on both platforms.
- Customer Support: If you run into issues with your DIY system, you’ll need quality customer support to help. We check for self-help options and test every customer service channel offered.
- Value: Instead of just looking at the price, we take into consideration the lifetime cost of each system which includes any subscription fees. Then, we compare that against what you get to assess its value.
Our home security system testing is done by one of our eight home security specialists, each of whom has at least three years of industry experience. Using our scorecard and meticulous methodology, we’re able to directly compare security systems based on unbiased results to identify the best DIY home security options.
>> More Options: The Best Security Cameras of 2025
Recap
We love installing and testing DIY security systems, though they’re not for everyone. While a lot of the devices require zero tools to set up, some other vital equipment might need mounting or access to internal wires. You also need to know where to place the components for maximum coverage. This is why we often recommend professional installation. You can take advantage of a technician’s expertise.
Of course, you’re free to make your own decision. If none of the options we recommended above seem like a good fit, take a look at our home security guide, which discusses how to best pick a security system for your specific setup, wants, and needs.
Frequently Asked Questions
While you think more about DIY home security, we’ll answer the questions we get the most.
-
What is the best “do it yourself” security system?
The best “do it yourself” or DIY home security system is SimpliSafe. With SimpliSafe, we installed the entire security system in 30 minutes and self-monitored it without monthly fees. It is the best, though, because it offers optional and contract-free professional monitoring options with really advanced features like live video monitoring.
-
What is the best home security system without a monthly fee?
We also consider SimpliSafe the best home security system without a monthly fee, because even if you self-monitor the security system, you’ll have access to the SimpliSafe app and almost all features of the equipment. One thing missing though is cloud video storage, but if you want your cameras to record, you can add just cloud storage for $9.99 per month.
-
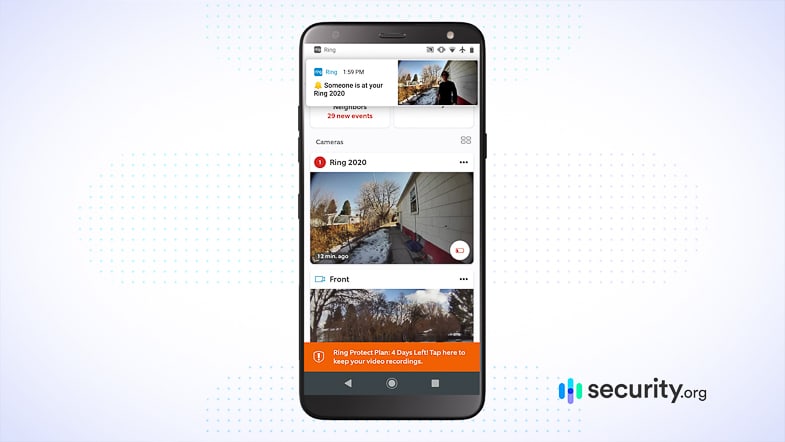
Which is better, SimpliSafe or Ring?
Both are DIY security systems with self-monitoring and professional monitoring options, but SimpliSafe is slightly better. It has a more proven track record, plus it offers a wider variety of home security equipment. Ring offers more security camera and doorbell camera options, though, so that’s one thing to consider if you’re deciding between the two.
-
Will I have to go through a credit check to buy a DIY security system?
Not always, but buying a DIY security system doesn’t guarantee that you won’t need a credit check. If you finance your equipment, the security system provider or their financing partner will have to check your credit worthiness. However, if you purchase your equipment upfront, you won’t need a credit check. Most DIY security system providers have that option.
-
Are DIY security systems suitable for large homes?
Yes, there are DIY security systems that work well in large homes, including SimpliSafe, Cove, ADT Self Setup, Frontpoint, and Abode. That being said, installing security equipment in a larger home requires more effort and time, which is why we typically recommend professional installation.
-
National Monitoring Center. (2024). VIDEO VERIFICATION.
nmccentral.com/video-verification/ -
ADT. (2024). Residential Security – Terms and Conditions.
adt.com/about-adt/legal/residential-terms-and-conditions